Creating realistic models for Microsoft Train Simulator (MSTS) can be an immensely rewarding hobby, but for beginners, it might seem a bit overwhelming. The key is to start simple and gradually incorporate more complex elements as you gain experience. Begin by familiarizing yourself with the basic tools and resources available. MSTS has a robust community where you can find forums, tutorials, and even free assets. Websites like UKTrainSim and TrainSim.com are gold mines for new modellers, offering downloadable content and guides. Make sure you have a good grasp of the simulator’s interface and functionality. Spend time exploring the different routes and trains that come with the base game to understand the standard of quality and detail you should aim for. Additionally, investing in a few basic software tools, such as Train Sim Modeler or GMax, will set you up for success.
Mastering the Art of Texturing
Textures are what bring your models to life, transforming basic shapes into realistic trains and scenery. The process of creating and applying textures requires both technical skill and artistic flair. Start with high-quality reference images. These can be photographs you take yourself or high-resolution images sourced online. Tools like Photoshop or GIMP are essential for editing these images and preparing them for use in MSTS. When creating textures, pay attention to the details, such as weathering, rust, and grime, which add authenticity. It’s important to map textures accurately to your models. This involves using UV mapping techniques to ensure that your textures align correctly with the model’s surfaces. Practice is key here. Don’t be afraid to make mistakes and learn from them. Joining online communities and participating in discussions can provide valuable feedback and tips from more experienced modelers.
Using Real-World References
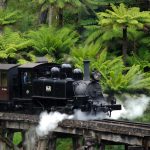
One of the best ways to achieve realism is by using real-world references. This means going out and photographing trains, stations, and rail yards. Pay attention to the small details, such as the color of the rust on the tracks, the wear patterns on the train cars, and the type of vegetation growing along the railways. Documenting these details will help you create more accurate and convincing textures for your models. Additionally, consider investing in a good quality camera and learning some basic photography skills. This will not only improve the quality of your reference images but also help you notice details that you might otherwise overlook.
Applying Advanced Texturing Techniques
Once you’re comfortable with the basics, it’s time to explore more advanced texturing techniques. Normal mapping and specular mapping are two powerful methods that can add depth and realism to your models. Normal maps create the illusion of surface detail without increasing the polygon count, while specular maps control how light interacts with the surface, adding a realistic shine or matte finish. These techniques require some additional software and a bit of a learning curve, but the results are well worth the effort. Experiment with different settings and see how they affect the final appearance of your models.
Perfecting the Model Detailing
Detailing is where your models really start to stand out. This involves adding small elements that enhance the overall realism of your trains and scenery. Begin by studying real-life trains and railways. Notice the small details like bolts, rivets, and other hardware that are often overlooked. These elements can be modeled separately and added to your main model. Another important aspect of detailing is weathering. Trains and railways are exposed to the elements and show signs of wear and tear. Adding subtle weathering effects, such as rust streaks, dirt, and faded paint, can greatly enhance the realism of your models. This can be achieved through careful texturing and using techniques like dry brushing or airbrushing in your 3D software.
Incorporating Animated Elements
Animation can bring an extra layer of realism to your MSTS models. Consider adding moving parts, such as rotating wheels, opening doors, or even animated passengers. This requires some additional technical skills and software, but the effect can be very impressive. Start with simple animations and gradually work your way up to more complex ones. There are many tutorials available online that can guide you through the process. Remember, the goal is to enhance the realism of your models, so keep the animations subtle and natural.
Essential Tools and Resources for MSTS Modelers
To create realistic MSTS models, having the right tools and resources at your disposal is crucial. Here are some essentials to get you started:
- 3D Modeling Software: Programs like Train Sim Modeler and GMax are tailored for creating train models. They offer a range of features that cater to both beginners and advanced users.
- Texture Editing Software: Adobe Photoshop and GIMP are invaluable for editing and creating textures. They allow for intricate detailing, essential for realistic modeling.
- Reference Materials: High-quality photos and diagrams of real trains and railways are crucial. Websites like RailPictures.net and Flickr have extensive collections of train images.
- Community Forums and Tutorials: Online communities such as UKTrainSim and TrainSim.com provide a wealth of knowledge. These platforms offer tutorials, downloadable assets, and forums for discussing techniques and troubleshooting issues.
- Books and Magazines: Publications like “Model Railroader” and “Railway Modeller” offer insights into the world of model trains and can inspire new ideas for your MSTS projects.
- Hardware: A good quality camera for capturing reference images and a powerful computer capable of handling 3D rendering software will enhance your modeling experience.
Having these tools and resources will streamline your modeling process, helping you create highly detailed and realistic MSTS models efficiently.